Hold Your Horses!
Aug. 21st, 2011 06:06 pmSo I did have the aforementioned crafty weekend last weekend. I made my entire inventory of pony cards for the fall season. As I get set to go back to school and practice for my road test, I'm worried I'll be scrambling to make stuff! My friends took my husband out and Muffin and I worked hard!
I took some pictures so that people can understand just how labour intensive a card can be. First, there's the ponies! The original pony card was made for my friend Noela Jewelry. I translated the pattern to my Pazzles craft cutter, but even that took some work perfecting as the software is fussy. Anyway, I cut a variety of bodies, manes, and tails.
Next comes drawing the eyes. Each eye is hand drawn and coloured with a fine marker. I use a dud pony as a template. It takes about a minute to draw each eye. Then I dot each one with a white Souffle marker to make it pop. Lastly, the manes and tails are glued on and decorated with Copic markers. By the time I got to the 30th pony, I was pretty worn out!

Once the ponies are assembled, I still need to assemble the cards. I cut 8.5x11" paper in half, then fold the halves, to make quarter fold cards. I use pastel colours because I like the way they show through the paper underneath. I print out a background, run it through the adhesive cartrige of my Xyron, and then stick it onto the cardstock. I could use white cardstock and just print the image, but full-bleed on scored cardstock is tricky for my printer.

I have a few designs - clouds, a rainbow and pasture.

But wait, there's more! The first batch of cards featured glitter stamped onto them. The glitter, while very fun, was very messy! I tried to move away from that with the second batch, but I didn't have an ink that was metallic enough. For this batch, I took a chance buying Tsukineko Brilliance metallic ink. It's really shimmery! The only thing I didn't like was that I found the little containers hard to open and I dropped them a few times :\

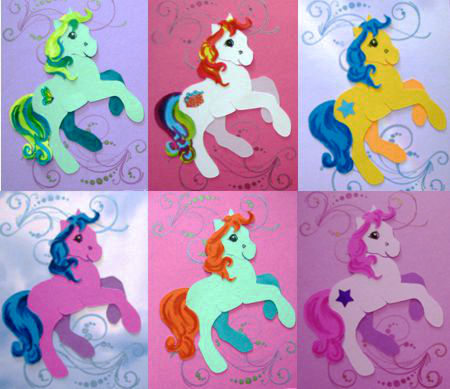
So 60 impressions later, the ponies are ready to go on the cards! It takes about 5-6 pieces of adhesive squares to secure on to a card. All the cards are blank inside, and some ponies get stickers on their rumps! Here are some of my favourites from this batch:
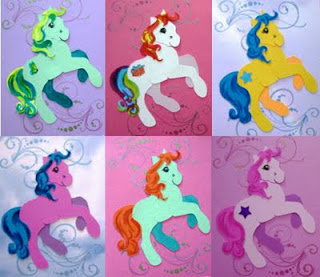
So far it seems like the most popular colour is white, which really surprised me. A few people have said to me, independently, that maybe it's because white is associated with unicorns. I dunno! We'll see what colour emerges the true winner after Christmas.
I took some pictures so that people can understand just how labour intensive a card can be. First, there's the ponies! The original pony card was made for my friend Noela Jewelry. I translated the pattern to my Pazzles craft cutter, but even that took some work perfecting as the software is fussy. Anyway, I cut a variety of bodies, manes, and tails.
Next comes drawing the eyes. Each eye is hand drawn and coloured with a fine marker. I use a dud pony as a template. It takes about a minute to draw each eye. Then I dot each one with a white Souffle marker to make it pop. Lastly, the manes and tails are glued on and decorated with Copic markers. By the time I got to the 30th pony, I was pretty worn out!

Once the ponies are assembled, I still need to assemble the cards. I cut 8.5x11" paper in half, then fold the halves, to make quarter fold cards. I use pastel colours because I like the way they show through the paper underneath. I print out a background, run it through the adhesive cartrige of my Xyron, and then stick it onto the cardstock. I could use white cardstock and just print the image, but full-bleed on scored cardstock is tricky for my printer.

I have a few designs - clouds, a rainbow and pasture.

But wait, there's more! The first batch of cards featured glitter stamped onto them. The glitter, while very fun, was very messy! I tried to move away from that with the second batch, but I didn't have an ink that was metallic enough. For this batch, I took a chance buying Tsukineko Brilliance metallic ink. It's really shimmery! The only thing I didn't like was that I found the little containers hard to open and I dropped them a few times :\

So 60 impressions later, the ponies are ready to go on the cards! It takes about 5-6 pieces of adhesive squares to secure on to a card. All the cards are blank inside, and some ponies get stickers on their rumps! Here are some of my favourites from this batch:
So far it seems like the most popular colour is white, which really surprised me. A few people have said to me, independently, that maybe it's because white is associated with unicorns. I dunno! We'll see what colour emerges the true winner after Christmas.